Dimensions & printing
Pixels, DPI, and print size: resize without confusing the three
Use six resize modes, calculate millimeters and inches in pixels, and distinguish target-pixel conversion from editing print DPI metadata.
A 600 × 600 image has 600 pixels along each side. A print setting of 300 pixels per inch would place those pixels across 2 inches. Changing the print density to 150 places them across 4 inches without adding image detail.
Imgkind’s resize tool can calculate output pixels from millimeters or inches and a DPI value. That value is used for the calculation; it does not write your selected DPI as a print-resolution tag. Check the print service’s requested physical size separately.
Calculate target pixels before exporting
For millimeters: pixels = millimeters ÷ 25.4 × DPI. For inches: pixels = inches × DPI. The result is rounded to whole pixels. A 25.4mm side at 300 DPI therefore targets 300 pixels.
These calculations do not make a low-detail source sharper. Enlarging creates more output pixels, but it cannot recover information absent from the input. A printer’s interpretation of file metadata can also differ from your intended layout.
| Requested side | Calculation density | Target pixels |
|---|---|---|
| 25.4mm (1 inch) | 300 DPI | 300 px |
| 2 inches | 300 DPI | 600 px |
| 2 inches | 150 DPI | 300 px |
Choose a resize mode that matches the constraint
Percentage changes both sides by the same factor. Fixed width or height sets one side and calculates the other. Longest and shortest edge apply to the appropriate side even when a batch mixes portrait and landscape inputs.
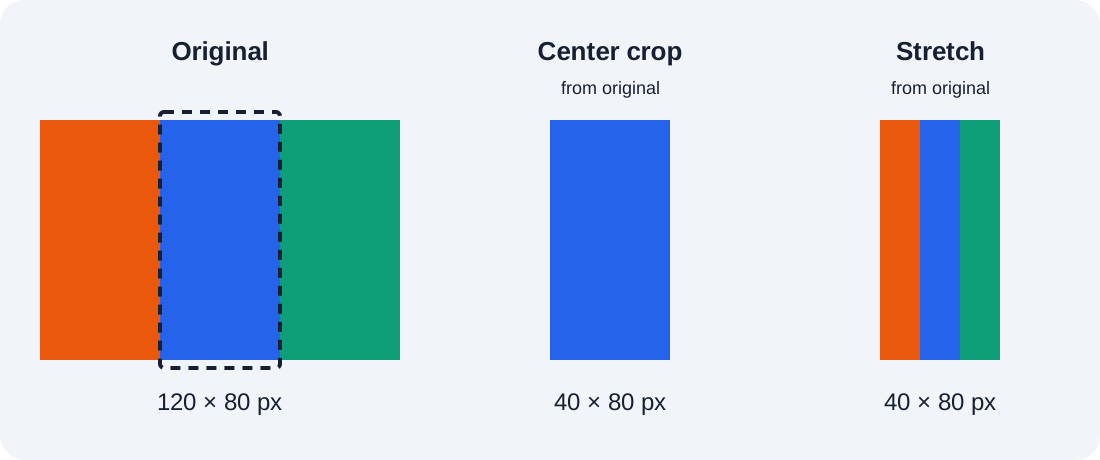
Fixed dimensions sets both sides. Center crop keeps proportions while removing the excess region; stretch keeps the full frame while changing proportions. If the subject is off-center, use the manual crop tool first instead of an automatic center crop.
A worked crop-versus-stretch example
For a 120 × 80 striped source, a fixed 40 × 80 center crop retains the central 40-pixel strip. A 40 × 80 stretch retains all three stripes but squeezes the width. Both files have the same output pixels and very different contents.
With Skip images that would need enlarging enabled, a 160 × 120 target returns the unchanged 120 × 80 file. It also keeps the original format even when a different output format was selected. The page marks that result as original kept.
Steps
- Select JPG, PNG, or WebP files, up to 50 images and 50MB per image. Wait for the original dimensions to load.
- Choose percentage, fixed dimensions, width, height, longest edge, or shortest edge.
- For a dimension mode, choose pixels, millimeters, or inches. Set DPI when converting physical units into target pixels.
- For fixed dimensions, choose center crop or stretch. Optionally keep originals that would need enlarging.
- Inspect the live target dimensions, choose output format, and process. Download one image or the batch ZIP, then check the actual files.
Helpful tips
- PNG ignores the lossy quality setting; JPG output uses a white fill behind transparency.
- The tool restricts output to 8192 pixels per side and 16 million total pixels to limit browser resource use.
- For printing, set the requested physical size in the print workflow and check a measured sample.
Frequently asked questions
Does selecting 300 DPI write 300 into the file metadata?
No. The current tool uses DPI to convert the requested physical units into pixel dimensions.
What does skipping a small image mean?
If either requested dimension would enlarge it, the original file is included unchanged, including its original name and format.
Why can a 50% resize be more than 50% smaller in pixels?
Halving width and height leaves one quarter of the original pixel count. Encoded byte size follows its own compression behavior.