Image Resizer
Batch resize by percentage, dimensions, or edges using pixels, millimeters, or inches
Images are processed locally in your browser and never uploaded.
Process multiple images and download a ZIP, or download a single image directly.
Drag & drop your image here
or click to select images · JPG / PNG / WebP · up to 50 images, 50MB each
JPG · PNG · WEBP
What does each resize mode do?
These examples all start with a 1200 × 800 px image, with “Skip images that would need enlarging” turned off. Every mode except exact dimensions keeps the aspect ratio and the full picture; calculated dimensions are rounded to whole pixels.
By percentage
Scale both sides by the same percentage. At 50%, each side is halved and the pixel count becomes one quarter. This does not mean the file size will be one quarter.
50% → 600 × 400 px
Exact dimensions
Set both output dimensions. If the original has a different aspect ratio, center crop removes edges while stretch changes the shape of the picture. Use this when both dimensions must match a requirement.
600 × 600 target → 600 × 600 px
Fixed width
Set the width; height is calculated from the original aspect ratio. Useful for images that need to fit the same page or column width.
Set the selected side to 600 px → 600 × 400 px
Fixed height
Set the height; width is calculated from the original aspect ratio. Useful for images that need a consistent displayed height.
Set the selected side to 600 px → 900 × 600 px
Longest edge
Set whichever side is longer. The other side scales proportionally and cannot exceed that value. Useful for keeping both width and height within a size limit.
Set the selected side to 600 px → 600 × 400 px
Shortest edge
Set whichever side is shorter. The other side scales proportionally and can exceed that value. Useful when both sides must reach a minimum size; this may enlarge the image.
Set the selected side to 600 px → 900 × 600 px
For an 800 × 1200 portrait, a 600 px longest edge gives 400 × 600 px; a 600 px shortest edge gives 600 × 900 px. The selected edge follows the image’s orientation, not a fixed width or height.
Center crop or stretch: same dimensions, different pictures
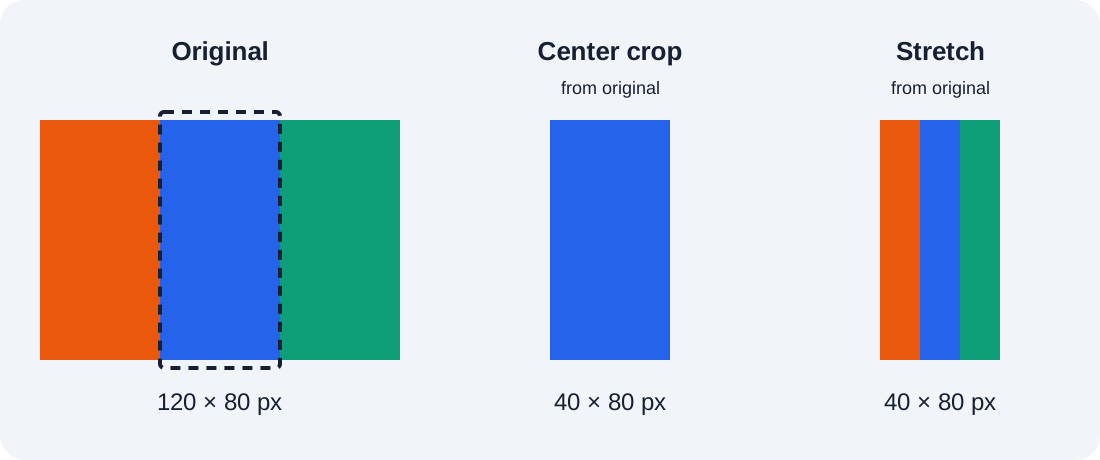
With a 1200 × 800 original and a 600 × 600 target, center crop uses the middle 800 × 800 area and scales it down, cutting 200 px from each side. People and objects keep their proportions. Stretch keeps the full picture but scales width and height differently, so shapes look narrower. Neither option adds padding; if you need to choose which area remains, use the crop tool.
A few settings that affect the result
- Skipping small images keeps the actual original file
- If either planned output dimension exceeds the original, this setting skips that image. Its dimensions, format and bytes remain unchanged, even if you chose another output format. Skipped images are still included in the download, so a batch may contain different dimensions and formats.
- Millimeters and inches are converted to pixels
- Pixels = inches × DPI; for millimeters, divide by 25.4 first. For example, 25.4 mm at 300 DPI becomes 300 px. This setting calculates dimensions and does not write that print DPI into the exported file. Check the printed size separately in your print software.
- Enlarging is not detail restoration
- This tool uses ordinary image scaling, not AI enhancement. Enlarging can look soft. File size also depends on format and quality, so a smaller pixel count does not guarantee a smaller file. PNG keeps transparency and ignores quality; JPG uses white behind transparent areas. “Keep original format” keeps the format, not the original file, unless the image is skipped.